Thursday 15 October 2015
White: K. Nevols - Black: G Hollands (163)
In Simon Webb's book 'Chess for Tigers', he gives the follow advice for when you are playing stronger opponents (or 'heffalumps' as he calls them). Stick to what you know - randomise - complicate the game - keep pieces on - avoid an ending. The theory is that, although you may well still lose, by jumping around a swamp, the heffalump might fall in a puddle, before the tiger does.
Here is the complete opposite and how not to do it. I play an unfamiliar set up, keep the game simple, and promptly get outplayed in an equal ending.
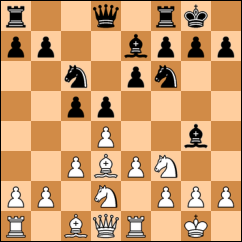
1. d4 d5
2. Nf3
First mistake. My team mates informed me that, against d4, my opponent always played the Slav with Bf5. I know very little about this opening and decided to avoid it by playing the Colle system instead.
Had I taken a minute to think, I would have realised that I know very little about any opening and so a Slav would not have made a lot of difference.
2. ... Nf6
3. e3 c5
4. c3 Nc6
5. Bd3 Bg4
6. Nbd2
The purpose of the Colle system is to build up towards an e4 push and a kingside attack. Black plays correctly however and places immediate pressure on the centre.
6. ... e6
7. e4 drops the d-pawn although 7. .. dxe4 8. Nxe4 Bxf3 9. Qxf3 cxd4 10. Bg5 might be an interesting pawn sacrifice. However, simply 8. ... cxd4 puts any thoughts of that to bed.
7. O-O Be7
8. Re1 O-O
When Black castles is usually the time White plays e4. But here it still drops the d-pawn and I could not see how I could sacrifice it for gainful play. Black simply delays Bxf3. Back to the text books for this opening.
9. b3?!
After a think, I decided that I needed to shore up the d-pawn before I could push with e4, so this move prepares Bb2.
9. ... Qa5!
Immediately jumping on the new weakness at c3.
10. Bb2 Rac8
I needed to get e4 in to get some space and decided to take on c5 at a time Black's only option is to take back with the Queen.
11. dxc5 Qxc5
12. h3 Bh5
At this stage I now put some thought into b4?! which looked like a wonderfully potty move. The idea being to follow it up with Nb3. One line might be 13. b4 Qd6 14. Nb3 Ne5 15. Be2 Nc4 16. Qc2 e5 with Bg6 to come.
13. e4
At last. Now here 13. ... Ne5 places some uncomfortable pressure but Black spots a different line.
13. ... dxe4
14. Nxe4 Nxe4
15. Bxe4 Rfd8
16. Qe2 Bf6!
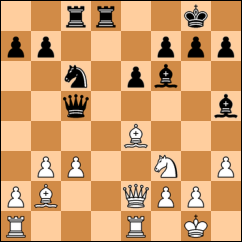
Black is now better and this calls for a think. I needed to unpin the knight, defend the b2 bishop so I could play c4, and challenge the d-file. Once again the crazy b4?! came into my head (with b5?! to follow) but I did not like the idea of the knight coming to e5 and then c4.
Instead I try to ease the pressure on the centre with a few exchanges.
(The computer disagrees with my assessment and considers the position completely even. It recommends the simple 17. Red1 as 17. ... Bxc3 can be answered by 18. Rac1 Rxd1+ 19. Qxd1 Qb4 20. Bxh7+ and Rxd3 regaining the pawn).
17. Qe3 Qxe3
18. Rxe3 Bxf3
19. Bxf3 Rd2
At this stage I saw that my intended 20. Re2 loses a pawn to Rxb2 21. Rxb2 Bxc3.
20. Rb1
I now had 23 minutes left for 15 moves. (I did not note down my opponent's time but he had plenty left).
20. ... Rcd8
21. Bxc6
It seemed natural to split the queenside pawns and also to stop his knight from coming to e5 and then moving further forwards. But these split pawns turn out to be effective defenders. 21. Kf1 preparing Re2 may have been better.
21. ... bxc6
The next few moves see me try to sort out my queenside to free up my pieces for some play.
22. a3 R8d3
23. Rxd3 Rxd3
24. Rc1 Kf8
25. Kf1 Rd2
26. Ba1 Bg5
The computer recommends using a different diagonal with 26. ... Rxa2 27. a4 Be7 and then to the c5 square to pressure f2.
27. Rb1 Ke7
28. c4 g6
29. Ke1 Ra2
30. Bd4 a6
31. a4 Bd2+
32. Kf1 Bb4
33. Rd1
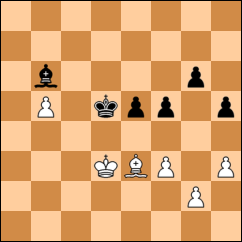
Mission accomplished. Black has moved his bishop to a better square but then so has White. White is about to move his rook to d3 and bishop somewhere to keep Black's king at bay. Now, with some relief that I was still on the board, I offered a draw.
33. ... Rd2
... which was declined. Black reasoned that he could not lose this position and so might as well play on and see what happens.
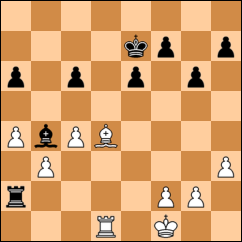
34. Rxd2 Bxd2
So what do we do? White must advance his King but avoid getting stuck into any mating traps or tactics. If possible, try to make a passed pawn on the queenside. Black has an extra pawn in the centre so will try to advance these. Even so, this should be an even position.
35. Ke2 Bb4
36. Kd3 Kd6
37. Ke4 Bc5
38. Be5+
Not 38. Bxc5+ Kxc5 39. Kd3 Kb4 40. Kc2 e5 and then Black advances his centre pawns.
38. ... Ke7
39. f3 f6
40. Bc3 f5+
41. Kf4
If 41. Ke5 Bd6+ 42. Kd4 e5+ and Ke6. I thought I would go after the king pawns.
41. ... h5
42. Kg5 Kf7
Afterwards my opponent told me he thought I was marginally better at this point. I am not so sure. I can't seem to mobilise on the queenside and I am a pawn down on the kingside. The best hope I have is just to keep moving about until he gets bored.
43. Kf4
I considered Kh6 keeping my king over there - as well as keeping his king busy - but was concerned about an e-pawn push in the centre by Be3+; Kh7 Bf4. Maybe then I could play b4-5.
43. ... Bd6+
44. Ke3
I so nearly played 44. Be5??? which loses to 44. .. g5+
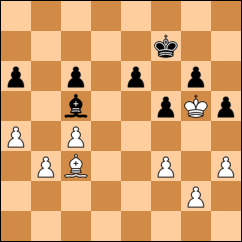
44. ... e5
45. b4?
And this is the loser. White tries to counter a centre push with some wing play but he is simply unable to break through on that side. Kd3 sitting tight is probably better.
(The computer disagrees thinking there is nothing wrong with b4. It is the next move - b5 - which is the mistake).
45. ... Ke6
46. b5 cxb5
47. cxb5 axb5
48. axb5 Bc5
49. Kd3 Bb6
Now it is very grim. Black has the simple task of gobbling up the b-pawn and then continue to push in the centre. However White should now play 50. Kc4 and stay active.
50. Bd2? Kd5
51. Be3?
Panic. I'm thinking if I can swap off all the kingside pawns I should be able to hold the draw, but I should have kept the Bishops on with Bb4. Now it is all over.
51. ... Bxe3
52. Kxc3 Kc5
53. g4 Kxb5
54. gxf5 gxf5
55. Kd3 h4
Time to remember what I have read about 'oppositions' - not that it is very helpful here.
56. Kd2 Kb4
57. Kd3 Kb3
58. Kd2 Kc4
59. Ke2 Kd4
60. Kd2 f4
61. Ke2 Kc3
62. Resigns
Of course, the Black king now comes to d3 and manoeuvres to e3 to take the pawn off.
This loss upset me. I was never once in the game, played it all wrong, adopted a passive opening I was not familiar with, never had the initiative, and, after congratulating myself on surviving the middle game, then proceeded to lose an equal ending. I could not sleep that night as every time I closed my eyes, a board with king, bishop and six pawns came into my view.
No comments:
Post a Comment